Synchronizing web driver and Ignoring Exceptions in C# Selenium API

In general the website response times may cause issues while doing the UI automation testing. Most of the times test scripts will fail due to synchronizations issues from web-driver and the application web elements.

Following are the common reasons and if we see very frequent issues in synchronization it is suggested to do performance testing and tuning.

  • Location from where we are accessing the application (Latency)
  • Network bandwidth
  • Too much firewall checks
  • Website architecture and technology on which website built on.

Most of these cases are taken care while doing performance tuning and performance engineering, but yet we see page load issues, element enabling issues and visibility issues while doing UI automation.

In selenium we have several methods that we can use to make sure that these things are taken care. Following is the just enough explanation about waits in Selenium driver.

Implicit waits will wait until the defined action (example page loading ) is complete.

Example of it is managed time outs, and they are defined at driver level.

Driver.Manage().Timeouts().ImplicitWait = TimeSpan.FromSeconds(30);
Driver.Manage().Timeouts().PageLoad = TimeSpan.FromSeconds(30);

When we want to wait explicitly at certain number of seconds we will use explicit waits. As the name suggests the test execution will be halted during this time. Example of it is sleep

 Thread.Sleep(2000);

here the parameter indicates the number of milliseconds to wait for.

The other case of waiting for dynamic web elements is using wait until or web driver waits. These are most common implicit waits that are used. There are two ways we can use these.

We can declare the web driver wait and and it will wait for max wait in this case it is 30 seconds, and repeatedly we can check for the expected conditions i this case we are looking for visibility of the element google search text box.

IWebElement textbox;
WebDriverWait waits = new WebDriverWait(Driver, TimeSpan.FromSeconds(30));
textbox = waits.Until(SeleniumExtras
.WaitHelpers
.ExpectedConditions
.ElementIsVisible((By.Name(SEARCH_TEXT_BOX_NAME))));

There is another way we can use this as function delegate, following is how it is used.

//there is another way using function delegate
//delegate parameters and return value = new delegate parameters return value of passed parameters
//delegate is on the fly function generator
Func<IWebDriver,IWebElement>checkForvisibilityOfWebElement = new Func<IWebDriver, IWebElement>((IWebDriver Driver) =>
  {
     IWebElement textBoxDelegate = Driver.FindElement(By.Name(SEARCH_TEXT_BOX_NAME));
       if (textBoxDelegate.Displayed)
           return textBoxDelegate;
       else
          return null;
   }); 
 
 textbox = waits.Until(checkForvisibilityOfWebElement);

When you look at above code, its function delegate takes one argument as IWebDriver and returns the IWebElement. The last argument of function delegate is always a return type.

The wait until function will take this and checks for the condition mentioned in the delegate periodically.

If you look at the until you can clearly see this text.

WaitUntill

But if we look closely, the description says it will throw exception if it is not listed in the Ignore Exception list.

For that purpose. We have to configure our waits object what exceptions that we want to ignore while we periodically check for our condition. We can achieve this by following.

IWebElement textbox;
WebDriverWait waits = new WebDriverWait(Driver, TimeSpan.FromSeconds(30));

waits.IgnoreExceptionTypes(typeof(NoSuchElementException));
waits.IgnoreExceptionTypes(typeof(ElementNotSelectableException));

There are list of exceptions that we may want to ignore, following is the snap shot.

ExceptionList

And finally following is the list of element states we can wait for.

ListOfwaitsfor

Please comment if you see anything is incorrect or you want to add something you know. Thank you.


Design Selenium Framework with C# – Part 5

Now since we have created the basic framework and page classes. Lets look at NUnit framework to create tests.

NUnit 3.0 supports parallel testing, and prior to that it supports the testing multiple iterations with different parameters.

Here if you see TestFixture attribute allows the test class to take the constructor parameter. I.E parameters you are defining in the testfixture will be passed to constructor of the test class if matching definition is found. This is very useful when we need to execute same tests with different browsers, we can define BrowserType to achieve the same purpose. The test class will be initiated and tests will be executed for each of those test fixtures.

Also Prallalizable (ParllelScope.Self) will run the test methods in parallel. More information can be found in below link.  Nunit documentation

If you look at the below code, constructor of the test class has browsertype as parameter which is matching with the parameter defined the test fixture. So the test class will run for each browser type.

NUnitTestFixure

And the SetUp attribute is similar to TestSetup in MSTest framework or BeforeTest in TestNG. This will sets up the preconditions for each test.

If you look at the test execution flow

  • Starts at calling DriverFactory.InitDriver(browserType)
  • This will invoke and create corresponding BrowserDriver class object
  • Driver property will be set in the DriverFactory Class with the type of the driver
  • Using the DriverFactory.GetDriver() method we are getting driver to the thread which has initiated it.
  • It will be passed to the Page Classes to do the rest of the test flow.DriverGet

If you look at the test explorer it identifies the tests based on the TestFixture types.

TestExplorer

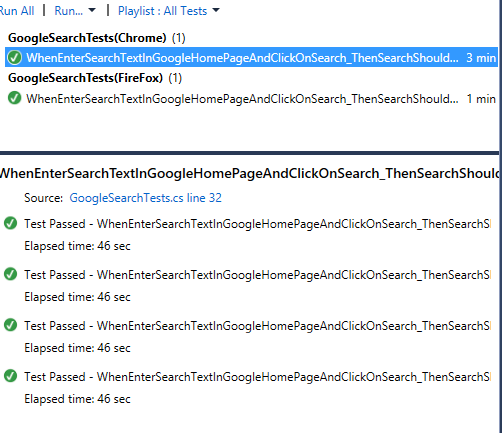
When you click on run it will run all tests in parallel. You can see the results in the test explorer for each iteration Results

IterationResults

This is the simplest explanation I could give quickly for the Selenium with C# implementation with interface design pattern.

I have not touched any Reporting/Logging part for the framework.

As It can be implemented with ILogger interface with different logging methods so that each logging type (Excel logging, Text, Word/pdf, html) can be implemented easily.

Having said this, it will conclude our discussion on creating the framework.

Please feel free to follow and write to me if you need help in understanding any of these items.

Design Selenium Framework with C# – Part 2

After learning the basics of the interface design pattern, lets look at actual implementation in step by step manner.

Lets first discuss about how to set up the required nuget packages for the selenium.

Open visual studio and create a unit test project by selecting the project type unit testing.

Once the project is created, lets install the required Nuget packages. This Nuget package is similar to maven repository in Java. It contains all binaries required for the purpose.

NuGet

We will download and map to the current project just enough to create some simple selenium tests.

The Nuget packages can be downloaded from different sources, lets download packages from default location https://www.nuget.org/

We need following packages for the purpose of creating the selenium tests.

Nuget required packages for selenium

Once we download and attach it to the project we need to do download another set of install-able files meaning that driver exes to steer the web browsers.

  • IEDriverServer
  • ChromeDriver
  • geckodriver (firefox dirver)

Now our project setup is ready for creating the Framework and implementing the simple selenium tests.

Before we dive into creating classes, lets create folder structure so that we can partition our classes into different directories like below. Will discuss one by one while we go through each of the items. Lets create following folders in the solution.

  • DriverExecutables
    • This will contain the driver executable files we have downloaded
  • IDrivers
    • Contract definitions for creating the WebDrivers
  • WebTesting
    • Actual web driver classes implementing the IDrivers interface.

FolderStructure

As we mentioned in the part one, let us first create the IDrivers interface to make browser object as described below.

IDrivers Interface

In the above Interface, we are defining the objects required fro web driver creation and also using the ‘Driver’ property we are setting and getting the driver back from each implementation.

In this step lets create the configuration class which defines the driver executable locations, timeouts and other browser configuration details we have just defined in the interface.

Configuration

Lets look at each of the web driver class, how it is done. I have kept all the code in git repository for reference.

Lets create filepath property to set and get the file path. Also see how we can set the driver services and desired capabilities/options as class properties.

After creating these properties, next step is to initialize the driver with these options

chrome driver implementation 1

If you look at  below code the folder path is set by config driver exe folder whereas DesiredServices and DesiredCapabilites/Options properties in config class are set by chrome driver class.

chrome driver implementation 2

I will try to explain the logical flow once we complete the entire post.

As of now the summary is, all driver classes (ChromeDriver, FireFox driver class, and IEdriver class)  have all the three methods.

driver classes

The link to the whole repository from git is given below for reference.

selenium framework git repository

It will be much more straight forward if you already well versed with the basic idea of properties, methods, and oops concepts.

Now lets discuss about how to create these browser instances as separate threads so that we can run tests in parallel in next part.

Design Selenium Framework with C# – Part 3

Design Selenium Framework with C# – Part 4

In this part lets look at creating the page objects in most generic way.

As discussed in the last post the selenium support of page object initiation is getting deprecated from next releases of the selenium. So lets create page objects in most generic format.

HomePage

In the above class, we are declaring the all const string or identification strings may be xpath or ids or css selectors as const strings.

And we are assuming that driver object is being sent to the class. We are creating class property as driver and assigning the sent driver while creating the page class object from test.  So the constructor of the page class takes one parameter driver, also if you look at it it take parameter type IWebDriver that means, any type of driver which implements IWebDriver is good enough, this will make class independent of the driver type.

HomePage2

In the above code we have created the web elements as properties of the class

And the actions as methods. We can create the elements in the methods as well. But to make differentiation between actions and elements, its good practice to keep the elements as properties.

I am not creating utility class as of now to keep the common methods in there, also there is no BasePage which has global objects of the application. We can very well do that, but for the simplicity , I have not added additional classes which makes it bit complex to understand the execution flow.

Similar to the above the class, we can create search results page and validation of the search results page in another class called GoogleSearchResults.

SearchResultsPage

And verification method for verifying the returned search result.

SearchResults2

Now that we have every thing ready we are good to create NUnit test and understand the execution flow. I will discuss it in next section.

Design Selenium Framework with C# – Part 5


Design Selenium Framework with C# – Part 1

In the current Selenium space there are lot of developments are happening. One of the most asked questions in the internet is how to design extensible and most easy frame work that can be suited for different kinds of testing platforms such as desktop, mobile.

Selenium with C# is not that common in the current freeware market era. But its worth knowing about how it can be implemented so that we can future ready. C# is now becoming language for building all kinds of apps including mobile. Having knowledge on C# selenium will bring us more opportunities for a devops engineer.

With that preface, I will try to create a logical flow of learning. Lets look at following areas one by one to achieve our goal of learning.

I typically go with bare minimum requirements to create the framework assuming readers know the basics of any object oriented programming language. So I am starting with concepts familiar but implemented little different in C#.

  • Basics of C# interfaces and setters and getters.
  • Basics of Interface design pattern for framework creation.
  • MS visual studio nuget packages required and drivers required for selenium
  • Driver factory or thread safe driver creation
  • NUnit testing framework bare minimum to Create basic google search test with Nunit

In this blog lets start with first section.

C# provides the important feature of setting and getting the class properties. There are auto properties which are really useful and takes care of the coding.

Setters sets the properties and getter will get you the properties. Following is the example of setters and getters. This is widely used and need to be understood while working with C#

public class test
{
private string _anyproperty;
public string AnyProperty
{
get{return _anyproperty;}
set{ _anyproperty = value;}
}
}

In the above example we can declare private variable and use it to assign and return. This is same as setting auto properties like below in C#.

public class test
{
public string AnyProperty
{
get;set;
}
}

Class properties can be set inside class or out side the class using the class object.
The properties are quite useful in designing the framework. Usually anything we want to set for the entire class such as file path for the excel operations class, file path for the browser driver class etc, this same path can be used in the class methods.

In the next section we will see how interfaces can be used to create portable and readable code.

Interface is generally known as contract agreement. It signs the contract with implementing classes. I.E it enforces the method definitions for implementing class.

The underlying code can differ with different class implementations.

In view of our selenium, let’s take the example of Browser driver, the IWebDriver interface holds the method definitions and all driver classes such as ChromeDriver, FireFoxDriver , IEDriver classes implements the methods in IWebDriver interface.

To understand how we can make use of interfaces to create clean code while designing the C# frame work, lets look at browser object creation.

In C# selenium browser object can be initialized similar to Java. To initialize browser object we need two objects

  • Browser Service
  • Browser Options or Capabilities.
    • IWebDriver ChromeDriver = new ChromeDriver ((ChromeDriverService)service, (ChromeOpions)capabilities, timeout)
    • IWebDriver FireFoxDriver = new FireFox ((FireFoxDriverService)service, (FireFoxOpions)capabilities, timeout)
    • IWebDriver InternetExplorerDriver = new InternetExplorerDriver((InternetExplorerDriverService)service, (InternetExplorerOptions)options, timeout)

If we look at all three initialization, in fact all driver classes implementing IWebDriver have these three parameters two of which are class objects.

It makes sense for us to utilize the interface concept here and create IDriver interface which have two methods (Service object creation and capabilities/option object creation)

This will enforce for all types of driver objects to implement these methods.

Lets end the first part here, and in the next part, will dive deep and create framework using MS visual studio.

Design Selenium Framework with C# – Part 2


Design Selenium Framework with C# – Part 3

In this section lets look at creating thread safe driver factory and how we can use it in the tests.

As we have seen in part 2, we have created driver classes and each class is having initDriver method which will creates the driver.

Now lets start with an enum with browser types, and in the driverfactory class which we are going create uses the browsertype enum and creates and stores the corresponding driver.

enum

And lets create thread safe object  using ThreadLocal class, thread local class stores the object initiated by the execution thread, so that when we want to use it we can retrieve it. Think of it as a thread id and driver object pair, each driver object has its thread id attached to it and based on the execution thread, ThreadLocal class will provide the corresponding Driver object.

DriverFactory

If you look at the second method, the GetDriver<DriverType> is generic method with DriverType as generic type of the webdriver.

Since we have declared the ThreadLocal type as ‘Object’ instead of standard class, it will not result in any cast errors.

In the init method based in the browser type we can create the browser object.

init

Here if you observe, the DriverStored property is being set in the InitDriver method.

And the DriverStored object is returned using GetDriver<BroweserType> generic method.

Now we have everything ready, and lets create a simple test and look at the where we are going start our driver initiation and how will we set the flow.

For now lets imagine, all page classes contain UI object creation and action methods.

(In the latest selenium 3.14 creating page objects using findsby is getting deprecated, so I am using POM concept but using it as more generic approach rather than using the regular init elements.)

Design Selenium Framework with C# – Part 4


Taking screen capture of Automation Element – TestStak.White

Hi There might be need where we want to take screenshot of particular automation element instead of the entire desktop or entire app.

Here is one way, that we can do that. I hare written general routine for getting the screen capture of the automation element.

public static void takeScreenShot(TestStack.White.UIItems.UIItem b)
 {
try
 {
 String path;
 Rect bounds = b.Bounds;

//getting values from Rect
 double h = bounds.Height;
 double w = bounds.Width;
 double x = bounds.X;
 double y = bounds.Y;

 //gettomg ramdom number, can change it to date time or somehting meaningful
 Random rndm = new Random();
 //this will generate randomnumber between 1 to 10,000
 int random = rndm.Next(10000);

//getting current directory
 path = System.AppDomain.CurrentDomain.BaseDirectory;
 //replaceing the bin and debug as BaseDirectory will return this
 path = path.Replace("\\bin\\Debug","");
 //creating path with random integer
 path = path + "results\\Screenshot_" + random + ".jpg";

//logic for creating
 //creating equalent in System.Drawing
 //Source point
 System.Drawing.Point p = new System.Drawing.Point(Convert.ToInt32(x), Convert.ToInt32(y));
 //Destination point
 System.Drawing.Point p2 = new System.Drawing.Point(0, 0);

//Creating Rectangle from Rect
 System.Drawing.Rectangle rect = new Rectangle(p.X, p.Y, Convert.ToInt32(w), Convert.ToInt32(h));

//Creating bitmap with desired height and width
 Bitmap bitmap = new Bitmap(rect.Width, rect.Height);

{
 Graphics g = Graphics.FromImage(bitmap);
 {
 //Coping screen where automation element is present (p) to destnation point on the image (0,0)
 g.CopyFromScreen(p, p2, rect.Size);
 }
 //Saving image
 bitmap.Save(path, ImageFormat.Jpeg);
 }
 }
 catch (Exception e)

{
 Console.WriteLine(e.Message);
 }

}
 }
}

Closer look at TestStak.White for windows Application Automation

In the context of UI testing of windows based application, White is well known and free framework.

In the visual studio 2015 we can install White with following nuget command.

Install-Package TestStack.White -Version 0.13.3

Once it is installed, we can use the ui finders and methods corresponding .Net Applications.

Let’s see how we can use the methods of TestStack.White to perform our Calculator testing.

Highlighted command Launches the application exe just like we do from run.

App.GetWindow is the method to get the parent window and it is start point of the whole testing flow as we go through we use window.Find methods to find controls in the parent window.

Another highlighted line in the below image is WaitWhileBusy.

10

There are several methods to do the synchronization in the elements and the properties, which we will be discussing in detail.

White framework extensively uses the finders in the UIA interface of the Microsoft.

Let’s examine following function to get the calculator button by text.

11

(figure 2)

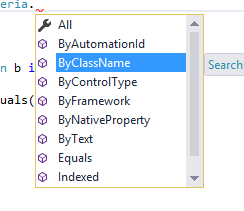
There are different search criteria’s to find the element in the window.

12

As looked highlighted above we are using control type to find collection of all buttons and filter them by the control text.

There are several control types TestStack.White supports. Following is snapshot of general .net controls.

missed

We can also use one finder in conjunction with another finder with “AndBy” commands like below.

missed2

“Window.Get” will get exactly one UI element and if we want collection of elements we can use

“Window.GetMultiple”

Most of the times GetMultiple will be useful where we want to see what is the collection size, and look at all elements and filter them by our needs.

In the (figure 2) there is mention of ExtensionClass, it is implemented for getting objects with wait.

The regular Get Methods does not include synchronization, in the below you can see how we can get elements with wait.

Below is the example where we are checking for length of the Items and periodically checking if length is zero until timeout is reached. We can also include exception handling and return the proper exception if length is zero.

missed3

By using these finders created following functions for clicking buttons and entering text items, selecting listboxes etc. Once all methods are done, its just matter of calling them to execute the tests.

Following is the functions created for calculator functionalities diagram for VS.

code map


BDD with Specflow

Let us discuss how we can implement BDD tests we have written with Speckflow tool in C#. If you are familiar with visual studio, you can install specflow with following.
In vs 2015 nuget comes by default and following is the command to install the specflow

Install-Package SpecFlow -Version 2.3.1

Once you install this you can use specflow with either nunit tests or MS unit test framework.
If you wish to use MS Unit Test framework, lets create unit test project.

1

Let us first see how we can implement the methods with Specflow tool we just installed.

Once we get the project structure in the explorer, let’s just add a speflow feature file with following.

Right click on project from project explorer (invoke project explorer if you are not seeing it from view menu). In the Add menu select new item and select specflow feature file.

2

You can directly type the scenarios that you have written in the feature file from my earlier discussion.

Intro to ShiftLeft and BDD in Automation Testing Context

3

The advantage of specflow is that it can generate the steps from what we have written in the feature file. Right click on the feature file editable area and select generate step definitions.

4

Once you select the generate step definitions, it will generate step file with all the definitions like below as raw file. Initially it shows “ScenarioContext.Current.Pending()” indicates that this must be replaced with the definitions of the steps.

5

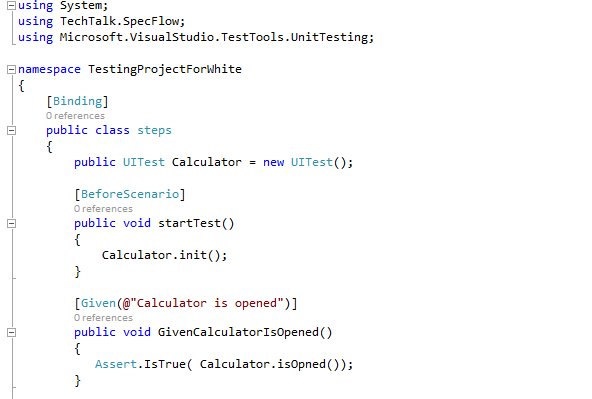
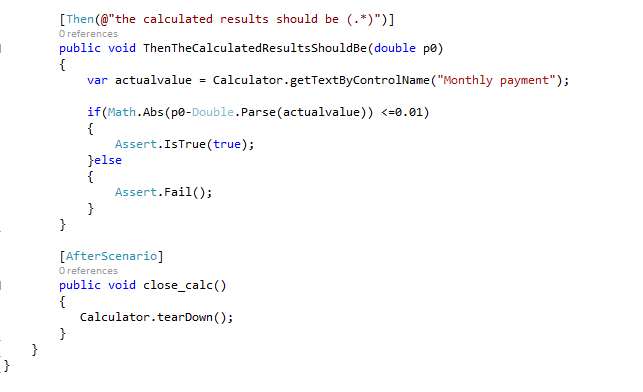
Specflow Provides the [BeforeScenario] and [AfterScenario] in the context of scenario. We can implement the methods corresponds to it.

Lets assume we have UITest class where we have written all methods corresponding to Calculator.

6

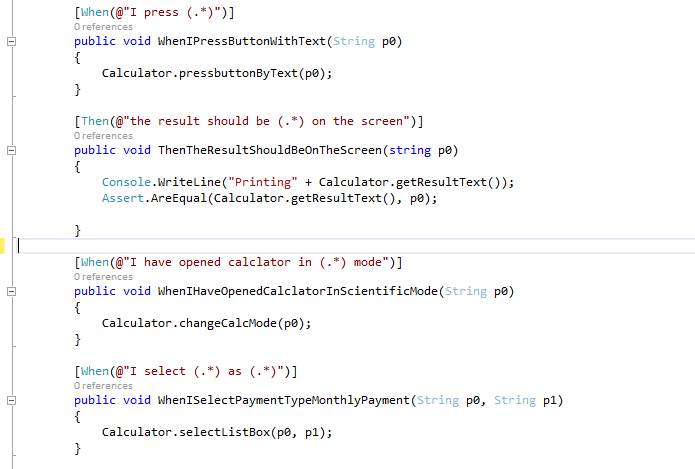
78

Since we have written mock methods in the speflow lets look at how we can implement these steps in the UITest Class.

Code Repository Can be found at SpecFlow Example

Intro to ShiftLeft and BDD in Automation Testing Context

In recent times the shift left is happening trend in the software DevOps.

DevOps is basically a ladder between development and testing which enables continues integration and continues development.

In the context of DevOps shift left testing is getting more focus as the strategy of shift left is to test early and deploy early. (shifting testing left side of the “requirements to development to production roll out” pipe line).

That means the automation testing should happen as and when build is getting generated. The cycle times of test execution must be low so that build can be generated quickly. To do this seamlessly with conventional automated testing tools is a challenge as these tools typically have different UI and not integrated with development environment.

So the ideal solution is to have IDE(Integrated Development Environment) or a plugin for development environments. Be it Microsoft Visual Studio, be it Java Eclipse or be it any other development environment, Test Automation can be performed right from IDE right from the same development environment integrating with favorite unit testing frameworks.

This will be one shop stop for both development and testing.

Selenium is already being great tool for Test Automation right from integrated build environments for C# and Java for Web Applications.

So where will BDD fit, BDD is approach for faster testing and provides transparency in testing “what you write as requirement (feature) is what you test”. Requirements are written as features and features are implemented and tested.

It starts with Features, which all features we want to include. And each features contain multiple scenarios and each scenario can have flavors with different data sets.

Application -> Features – > Secenarios -> DataSets

Let us try to write the feature and scenarios for Calculator application in general to get to better understand, and after that we can see how these features can implemented.

Lets first create feature file as calc.feature  and write following.


bdd1

Then lets choose how many types of scenarios we want to cover for this feature and tag them separately.

@Basicoperations

@Advancedoperations

Let us take in each of these operations lets write basic scenarios with keywords Given, When and Then.

Given describes or sets the context of the scenario under stated environment. The best practice is to check the system state. Its like prerequisite for the given scenario.

When describes the state change parameters. Like user actions to move the system from one state to another state.

Then describes the consequence or result caused by the state change. Its like if when is the cause Then is the effect.

And is key word will be used to add multiple whens or multiple Thens.

But is used in the same context as then and mostly used for negative testing.

Here is how a scenario looks like.scenario example

The tag @Basicoperations is like category of the test.

Scenario Outline can contain multiple examples, It is always better to write as Scenario Outline instead of just scenario so that we can specifically mention the parameters and looping of the test data is also possible.

We have several ways of writing the same scenario. Its better to write the scenario as re-usable blocks so that the steps can be re-used.

Let us take another example to see how we can re-use the same steps.

In the below scenarios same steps are used as above scenario and just the operation is being changed.

bdd2

Let us look at @Advancedoperation description and figure out how we can write the detailed re-usable steps for more advanced operations.

advanced

In the above we can see multiple and statements and some of the “And” statements are similar. The above scenario enters data in below form. the multiple And statements enter the values in the respective text boxes.

form

This is very small example of how we can write BDD tests, I will try to explain how this can be implemented in next blog.